Tag Archives: childrens music.

Easy Morris Dancing Bells For Children

may day morris dancing

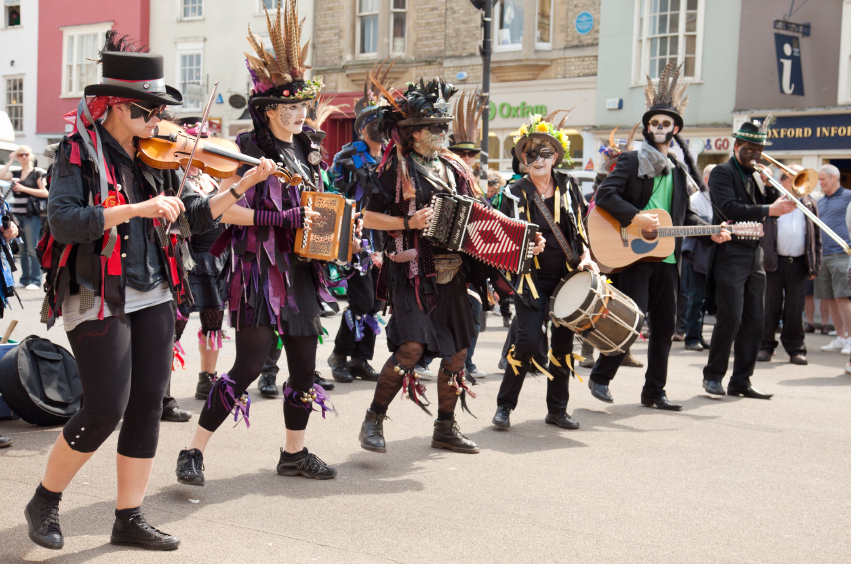
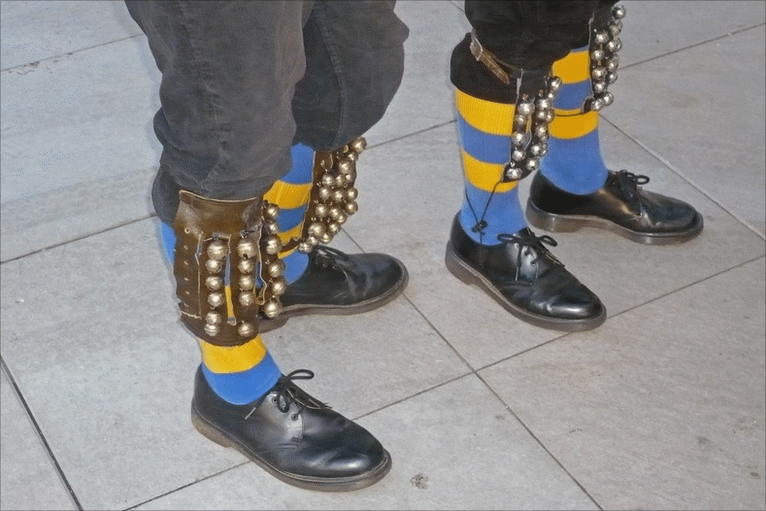
Around May Day, dancers in parts of England are getting ready to welcome the Spring by morris dancing.   They dress in colorful costumes and the bright and happy morris dance music is punctuated by the jingling and jangling of special bells worn on the legs.

Since young children love to move and dance, making an easy version of this traditional “knee-pad” instrument can be a fun way to welcome a new season, to exercise and to explore world cultures.

morris bells suppliesHere are the supplies you need for a simple, homemade version of morris dancing bells.

Supplies

Two short lengths of elastic of any width (about 10 – 14” long)

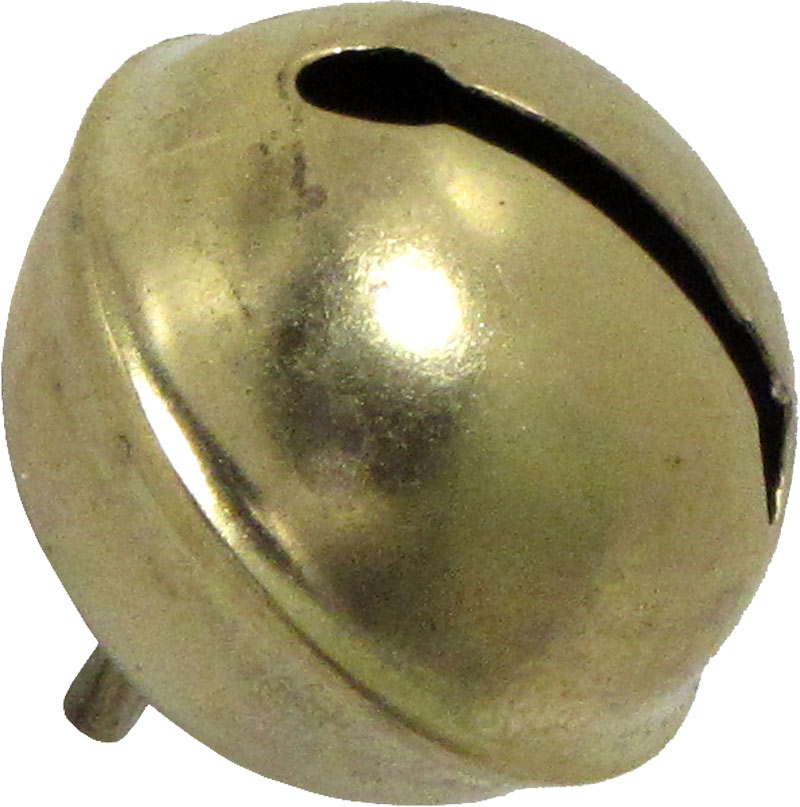
A handful of jingle bells

Any number of extra buttons, beads or similar jangles.

Assorted ribbons, yarns and embroidery thread

Needle and Thread

Start by cutting two pieces of elastic and making sure they can comfortably stretch around a child’s leg and sit just under the knee.  Leave a bit of extra length for the elastic to overlap.  This will be where you will sew or pin it in place.

morris bells - craftingPlace your elastic “laid out straight” onto your work area.  Since most elastic is white, you can use markers to color and decorate it before you add ribbons and bangles.

Create the hanging jingles by threading a jingle bell on a small ribbon or piece or embroidery thread.  Tie it onto the end and then add on any other buttons, beads or jangles that you like.  When you’ve reached the desired length, tie it in place onto your elastic.  Add as many of these as you like.

Add some ribbons or yarn to the morris bells.  Sew or tie them into place.  They may not add to the sound of your instrument, but they will move as you dance and add to the overall beauty of what you’ve created.

Last, sew or safety pin your morris bells to the right size for fitting around the leg of your child.

morris bells on kyraDancing With Bells!

You can use this craft to explore the music of morris dancing or the general music of the British Isles.  Or you can dance to any of your favorite songs.  If you get a chance to see actual morris dancers, you’ll notice that both boys and girls participate in this dance tradition.

Although there are many different traditions of morris dancing, some also involve waving handkerchiefs, dressing up in wild clothes or having a parade – all fun activities to do to welcome the Spring.

FacebookTwitterGoogle+Share

Easiest Instruments For Young Children – Recycled Rattles

There’s a reason you find rattles in almost every culture around the globe.

They are amazingly simple and very powerful at the same time.  A child playing a rattle becomes aware of how his or her movements change the sound they are making.  They realize how the sound they create can “fit” with a beat and most studies of young children show that they are keenly aware of rhythmic patterns.  Making and playing several varieties of homemade rattles can be a great way to explore music and have fun with a young child at the same time.

Recycled Rattles for Home or Classroom Play

Most early rattles were made of materials such as dried gourds, seashells, clay, coconuts, bark and a variety of other natural objects.  In Africa, caxixi rattles are made from woven fiber.  In India, special rattles are made from colorful palm fronds woven together in clever patterns.  On the coast of Peru there’s even a rattle made from the jawbone of a donkey.  In short, people make instruments from materials that they have found available near their home.  We are going to take that same approach to creating recycled rattles!

Clean and dry a variety of small plastic containers (water bottles, juice containers, etc.) and assemble some objects that can serve as the contents of the rattles. Here’s a list of common materials that work well and the type of sound they create:

Quiet rattles: sand, salt, sugar, confetti, cotton balls, craft puff balls, paper bits, Q-tips, tiny pasta (such as pastina or acine de pepe).

Medium Rattles:  paper clips, small pebbles, birdseed, small beads, small dried beans, rice, smaller buttons.

Loud Rattles:  dried macaroni/pasta, large pebbles, large beads, coins, large dried beans, larger buttons.

The Inside of the Rattle

Choose the objects you’d like to add to the rattle to create the sound and also consider including some decorative elements.  Since plastic containers are transparent, you can easily add confetti, glitter, colorful ribbon, pipe-cleaners or similar items. They won’t alter the sound but they will add color, beauty and interest when the rattle is being played.

Two Recycled RattlesThe Outside of the Rattle

If you like, you can decorate the outside of the rattle with stickers, markers or add a handle made from pipe-cleaner, yarn or ribbon.  Feel free to get creative.  When you’re done, it’s time to seal it with some sturdy tape, such as electrical tape.  This helps keep the contents inside and generally makes it more child-safe around young music-makers.

Now you’re ready to have fun with your rattle!

Time To Play!

Shake along while you sing one of your favorite songs. Try playing slowly and shaking your rattle to the beat.  Then speed up the song. Can you keep up and keep in time?  Play along with recorded music.  Listen to different types of music and see how your rattle fits in with the music being played.

An Easy Rattle Game For Young Children

If everyone in a class or a small group has made a rattle, you try this easy game.

Ask the children to play a certain way until the music stops.  For instance, the teacher can say: “Shake your rattle softly until the music stops”.  The teacher stops the recorded music (like in a game of musical chairs) at an unexpected place and sees if all the students were able to stop at the same time.  Next, change the directions to other simple ways to play, such as:

Shake your rattle back and forth until the music stops.
Shake your rattle up and down until the music stops.
Shake your rattle round and round until the music stops.
Shake your rattle very softly until the music stops.
Shake your rattle loudly until the music stops.
Shake your rattle down low until the music stops.
Shake your rattle up high until the music stops.
Shake your rattle quickly until the music stops.
Shake your rattle slowly until the music stops.

Aside from this one game, there are lots of other ways you can make music and have fun with a rattle while you are learning, playing and recycling – all at the same time!

Here Are Some Variations On Rattle Crafts:

Monster Rattles – From Egg Cartons
http://www.dariamusic.com/docs/MONSTERInstructions.pdf

Woven Caxixi Rattles From Milk Cartons
http://tinytappingtoes.wordpress.com/2013/02/05/make-your-own-woven-caxixi-rattle/

Native American Turtle Rattles
http://www.dariamusic.com/docs/TurtleRattleInstructions.pdf

————-


Over In The Meadow – A Great Song For Welcoming Spring and Counting Baby Animals!

nting imageWhat’s more fun than animal babies?

One of my favorite children’s songs – Over In The Meadow – combines cute creatures and learning the skill of counting to ten.   I first heard the song from a friend of mine who was a folksinger in Appalachia, but later found out that this popular rhyme may date back as far as the 1600’s in England.  So it seems that some things are universal.  Parents love to teach their children with music and no one can resist a baby animal!

The songs starts in a pond in the sun with one mother frog and her “little froggy one”.  Then there are kittens, birds, worms, bees, dogs, owls, ducks, mice, and even ten spiders.  And, best of all, each of the animal babies know how to listen to their elders!  Since the song has an easy-to-follow formula, even the youngest kids get the idea of counting up one number each time and can easily follow or sing along.

Although the song was originally written with each animal and their mommy, I’ve added dads, grandmas and grandpas to the verses in my version.  In my travels I had met many kids that did not always have traditional families or a mom at home as a caregiver, so I changed the song a bit to help these children feel that their family was special and important, too.

You can see my version of Over In The Meadow here:

Over In The Meadow – Lyric Page
http://www.dariamusic.com/meadow.php

Over In The Meadow – Printable Lyric Page
http://www.dariamusic.com/docs/songs/Over%20in%20the%20Meadow%20Songbook.pdf

Over In The Meadow On Itunes (Track 13)
https://itunes.apple.com/us/album/this-little-light-of-mine/id292915765?i=292915774&ign-mpt=uo%3D6

Over In The Meadow On Amazon Mp3
http://amzn.com/B0024XB2FS

Silly Songs for Kids: How Much Wood Could a Woodchuck Chuck?

Groundhog’s Day is on its way and it’s a great time to encourage being silly with your little ones!  Do you remember tongue-twisters from when you were a child?  Did you ever say “She sells seashells by the seashore” or wonder how many pecks of pickled peppers that peter piper could pick? Or collapse in giggles because it was really hard to say “rubber baby buggy bumpers” three times fast without totally messing it up?

Although it may not seem very serious, any time you speak or sing to your baby or child you’re increasing their intelligence and helping them develop language skills. As they listen and enjoy the sound of your voice they are developing their sense of what sounds right, even if they haven’t begun to speak on their own.

And, best if all, you are bonding.  Although a tiny baby can’t pop up out of her crib and say “Gee mom, thanks, that really made me laugh!”.  Or her toddler brother won’t declare: “Wow, that increased my vocabulary!”, children know when you are speaking to them and sense your delight in playing with words or in singing a simple song or a set of silly syllables!  It stimulates their mind and the attention makes them feel wanted, included and loved.

So, if you’re stuck inside in the cold, you might want to pass the time by trying some tongue-twisters with your kids. Or you might want to try your hand at the Groundhog’s Day song. It asks the timeless question:

“How much wood could a woodchuck chuck if a woodchuck chuck could chuck wood?”  and

“How much ground could a groundhog hog if a groundhog could hog ground?” and even

“How much sap could a sapsucker suck if a sapsucker could suck sap?”

If you master any of the groundhog’s day tongue-twisters, you might want to reenact Groundhog’s day in your own living room.  Below is a link to an easy pop-up puppet activity.  Color your own puppet and the woodchuck or groundhog will pop out of the cup to see its shadow – or not!

So whether you’re waiting for Spring or not concerned about the weather at all, take the time to speak or sing a silly rhyme with your child.  Or try not to trip over a tongue-twister with them!  Chances are good, they will love and remember the fun you’ve had with them for a long time to come!

Fun Resources

Groundhog’s Day Song – Printable Lyric sheet

http://www.dariamusic.com/theGroundHogSong.php

Groundhog’s Day Pop Up Puppet Activity

http://www.dariamusic.com/docs/PuppetInstructions.pdf

Groundhog’s Day Song On Amazon mp3

http://amzn.com/B003YE1T2C

Groundhog’s Day Song On Itunes

https://itunes.apple.com/us/album/groundhog-song-how-much-wood/id385842751

Lyrics to The Groundhog Day Song

The Groundhog Song (How Much Wood Could A Woodchuck Chuck?)

Words and music by Daria A. Marmaluk-Hajioannou

How much ground could a groundhog hog

If a groundhog could hog ground? (2x)

If he could hog ground,

On Groundhog’s Day

I know he surely would!

But, how much ground would a groundhog hog

If a groundhog could hog ground?

How much wood could a woodchuck chuck

If a woodchuck, could chuck wood? (2x)

If she could chuck wood,

She would chuck wood

I know she surely would!

But, how much wood could a woodchuck chuck

If a woodchuck, could chuck wood?

How much sap could a sapsucker suck

If a sapsucker could suck sap? (2x)

If he could suck sap,

He would suck sap

I know he surely would!

But, how much sap would a sapsucker suck

If a sapsucker could suck sap?

Some Popular Tongue Twisters (In English) 

She sells seashells by the seashore.

Toy boat. Toy boat. Toy boat.

I saw Esau sitting on a seesaw.  Esau, he saw me.

Peter Piper picked a peck of pickled peppers,
A peck of pickled peppers Peter Piper picked.
 If Peter Piper picked a peck of pickled peppers,
Where’s the peck of pickled peppers Peter Piper picked?

A proper copper coffee pot.

Six thick thistle sticks. Six thick thistles stick.

Three free throws.

One-One was a racehorse.
Two-Two was one, too.
When One-One won one race,
Two-Two won one, too.

Which wristwatches are Swiss wristwatches?

Write Your Own “12 Days Of Christmas” Carol!

Singing with your children is one of the simple pleasures of the holiday season.  It’s a great time to relive memories from your childhood and also to make new ones for your family! Have you ever thought of making your own, custom-tailored Christmas song?  If you have creative kids and a sense of humor, you can easily make your own version of the classic holiday song – the Twelve Days of Christmas.

Almost everyone is familiar with the song’s lyrics:

“On the first day of Christmas, my true love gave to me,

a partridge in a pear tree.”

Then, each day, a new gift is added and the list becomes part of the song.  To see the popular list of 12 days/gifts, take a look below.  However, originally the song was used as part of a memory game where each person added a verse and then had to recite all the items that had come before them.  Some people believe there is special hidden symbolism in the words, and that each items reflects some part of the story of the life of Jesus.  In any event, the song has been treasured and passed down for many generations and has easily become part of holiday festivities in countries all over the globe.

How can you write your own version?  Use the same melody and format, but add the names of things that are special to you and your loved ones.  You can also describe what the holiday means to people in your area.  For instance, here’s a great version of the 12 days of Christmas written by a class of school children in St. Croix.  The wanted to share what holiday cheer meant to them on their island.  It’s a funny and fun version of their own special 12 days and I especially love their choice for day 5 – five centipedes!

Here’s what they created:

On The Twelve Days of Christmas – Crucian Style
On the first day of Christmas my true love gave to me,
An iguana in a Mango tree.
On the second day of Christmas my true love gave to me,
2 forts with cannons etc.
On the third day of Christmas my true love gave to me,
3 mocko jumbies etc. (Special stilt walkers seen in St. Croix)
On the fourth day of Christmas my true love gave to me,
4 frogs a singing etc.
On the fifth day of Christmas my true love gave to me,
5 centipedes etc.
On the sixth day of Christmas my true love gave to me,
6 cruise ships coming etc.
On the seventh day of Christmas my true love gave to me,
7 roosters crowing etc
On the eighth day of Christmas my true love gave to me,
8 geckos climbing etc.
On the ninth day of Christmas my true love gave to me,
9 lobsters swimming etc
On the tenth day of Christmas my true love gave to me,
10 Crucians speaking etc
On the eleventh day of Christmas my true love gave to me,
11 children dancing etc.
On the twelfth day of Christmas my true love gave to me,
12 steel pans drumming etc.

What can you sing about?  Choose anything that is a part of your holiday celebration.  Will there be a number of presents wrapping?  A nativity set up?  Cookies being baked?  Visits to friends?  Are their ornaments to be hung?  Special pictures to be taken?  Carols sung by the tree?  If you enlist your kids help, it won’t be hard to find 12 things you all love about Christmas to turn into a very special and unique song.

Here’s hoping this fun holiday song makes some great memories for you and your family this year!

The Original 12 Days of Christmas

1 A Partridge in a Pear Tree

2 Turtle Doves

3 French Hens

4 Calling (or Colly) Birds

5 Golden Rings

6 Geese A-Laying

7 Swans A Swimming

8 Maids A-Milking

9 Ladies Dancing

10 Lords A-Leaping

11 Pipers Piping

12 Drummers Drumming

———————————–

Many thanks to Miss Barb and her students at the AZ Academy on the island of St. Croix for allowing me to share their creative songwriting in this post!

Illustration is from the Catholic Toolbox, who have created a cute memory game with the twelve images seen here:

http://catholicblogger1.blogspot.com/2009/11/twelve-days-of-christmas-memory-game.html

Go Ahead – Play With The Box!

rattle box suppliesAlmost every parent has had the experience of giving their child a special present and finding that they were more excited about playing with the box. So, why fight it? With the holidays bringing so many different size and shape packages to your doorstep, it’s a great time to have a little musical fun by creating instruments called rattle boxes. If you add textured fabric or paper as you decorate them, it becomes a musical and sensory experience as well!

This flexible craft is also a great way to recycle bits and pieces of other craft projects that you might have on hand. Take a look at these basic supplies: any size cardboard container or mailing tube, any variety of paper, fabric or bric-brac, plain glue, hot glue or any type of tape. For the inside, you can use anything from extra jingle bells to pebbles, dried macaroni, bird seed or even Q-tips or paper clips. The list below offers some ideas for quiet, medium and loud rattling boxes.

maraca contentsMake Your Box Rattle!

Before you seal the box or tube and decorate the outside, choose a filling. Try it out and see if you like the sound it makes when you shake it around. Some things like Q-tips make a wonderful quiet sound and objects such as buttons, beads or pebbles made for louder noise when played.

Seal it Up!

Although you’ll be decorating the outside of the container, it’s a good idea to take packing tape and seal up the edges or other places where the contents might escape to contain any objects that might present a choking hazard.

Decorate The Outside

Here’s where you can get creative. Wrap the box in fabric or different papers. Create a simple design or go crazy with a patchwork effect. Some fabrics you might use are wonderful to touch such as felt, velvet, velour, suede or gauze. Scrapbooking papers often have nice textures that can add to the sensory experience of this project as well. Add fabric swatches or trim and glue or hot glue in place.

Shake, Rattle and Roll Away!

Now it’s time to play. Put on some of your favorite music and rock out! You can shake back and forth, up and down, fast or slow. You can play quietly or loudly. I encourage parents to make a few of these and play along with their child or make some for siblings to hear how the sound is different as you play. Although this is a simple and fun activity, it also is a great way of developing listening skills and for exploring the world through touch. As you’re having fun with your child you might say: “Let’s play the quiet soft box with this song”, “Let’s switch to the loud fuzzy box for this one!” or “What sounds good to you? “Which one would you pick?”

You Can Make Your Box Rattle With:

A Quiet Rattle Box:

sand, salt, sugar, confetti, cotton balls, craft puff balls, paper bits, Q-tips, tiny pasta (such as pastina or acine de pepe).

A Medium Rattle Box:

paper clips, small pebbles, birdseed, small beads, small dried beans, rice, smaller buttons.

A Loud Rattle Box:

dried macaroni/pasta, large pebbles, large beads, coins, large dried beans, larger buttons.

———————————————–

Find more easy and fun musical crafts at:

http://www.dariamusic.com/crafts.php

Easy and Fun…Button Castanets!

Have you ever seen Spanish castanets?  Traditional ones are beautifully crafted or carved from wood and often painted with themes like the Spanish countryside or elegant dancers. Playing the castanets is a fun way of allowing a child to develop a sense of rhythm, fine motor skills and also a great way to explore the music and culture of Spain.

Many historians think that castanets – or castañuelas in Spanish – were originally made from the shells of walnuts or chestnuts. Since creating “walnut shell” castanets might be complicated and require tools such as drills, we wanted to share a simpler version of homemade castanets that can be made from sturdy paper, buttons and glue.

Start by cutting rectangles of the sturdy paper about 4 – 6 inches long and about ½ to 1 inch wide. Fold the paper in half so that it leaves a crease in the middle.

Next, choose a pair of buttons and glue one on each end. After the button castanet is dry, pick it up and play by clicking the buttons together. Make several pairs with different kinds of buttons and notice how the sound is unique with each one. (One safety note: If you are working with small children or have younger children nearby, be cautious about the buttons as potential choking hazards if swallowed.)

Playing Button Castanets

This craft is so easy that even an adult can do it! Feel free to learn and play along with your child. Simply put the button castanets between your thumb and first finger and click away. Play fast, slow, or tap back and forth between the left hand and right hand. Click or clack along to a favorite song or rhyme or put on a recording of music that you love. See if you can match the beat you hear or create a new one that works with the song.

Intrigued by castanets and what you can do with them? Here’s an article that tells you more about their background and shares one woman’s amazing talent in playing this type of hand percussion.

What Are Castanets or Castañuelas

http://makingmulticulturalmusic.wordpress.com/2012/05/14/what-are-castanets-or-castanuelas/

Supplies For This Project:

A small amount of sturdy paper (such as a recycled manila folder or poster board)

Pairs of buttons

Glue or glue gun

Three Great Musical Projects For Kids Of All Abilities

This post was written as a contribution to the Living Life Special Blog Carnival. The participating bloggers are sharing their experiences in parenting or teaching children with special needs.  Also included are posts on how to educate others about special needs.

Crafting a simple musical instrument is a satisfying project and parents or siblings can each make their own versions of the same craft for added fun.  When the project is complete, you can play your instruments together or along with favorite music. Some instruments; like the quiet rattles or ocean drum, also make excellent activities for taking along in the car or to soothe a child through a rough moment in their day.

Here are three of my favorite crafty musical projects for sharing with kids of all abilities.

A DRUM THAT SOUNDS LIKE THE OCEAN

This is a musical instrument that can be amazingly relaxing.  Tilt it gently from side to side and you can hear the sound of the surf or the waves of the sea.  If you’ve filled it with things such as colored seed beads, you’ll also see a wonderful variety of patterns move as you listen to the sound of your hand-held drum.

Above is a picture of the actual instrument and here is one of our homemade versions as well. Supplies needed for this project are a thin cardboard box (like a shipping box), clear vinyl or a recycled book report cover and small, roundish items to fill the drum.  You can use whatever you have available such as birdseed, dried peas, tiny pasta or small beads.  Seed beads of various colors help create wonderful patterns when this drum is played and tilted from side to side.  You’ll also need some clear packing tape to seal up the project and materials for decorating the outside of the box.

You can find complete step-by-step instructions here:

www.wonderbaby.org/articles/drum-sounds-sea

THE WORLD’S QUIETEST RATTLES

I love making quiet rattles.  They can be played with any type of music and can be different each time you create them.

Supplies needed for this project include any clear recycled container such as a plastic water bottle, soda bottle or milk jug.  Then you’ll need some quiet fillings such as q-tips, cotton puffs, paper clips, tiny pasta, sand, salt or sugar.  You’ll also need some sturdy tape for sealing your instrument.  If you want to add decorative fillings, try confetti, glitter, craft feathers, colorful shredded paper or twisted pipecleaners.

Start with the clean recycled container and begin filling it until you find the sound you like the most.  You can find examples of really quiet rattles and complete instructions here:

http://www.theseedsnetwork.com/search_result.php?i=421/

A HOMEMADE RAINSTICK

Travel to the rainforests by creating your own unique rainstick.  Add designs from South America, Australia or the American Southwest.  You can also decoupage or quilt one and it will last for years!  To make a homemade rainstick, you’ll need sturdy mailing tube (with end caps) a bit of floral wire, jewelry wire, pipecleaners and some different ingredients that will help create the sound of the rain as they trickle back and forth throughout the tube.

Playing a rainstick is easy.  You just turn it over and let the magic begin.  If you are playing one, few people can resist saying, “hey, can I try that, too!”  You can see some additional pictures of creative, homemade rainsticks and complete step-by-step instructions in a pdf here:

http://www.dariamusic.com/docs/RAINSTICK%20Instructions.pdf

WANT TO EXPLORE MORE INSTRUMENTS?

If you and your child would like to explore more musical instruments, feel free to stop by my website.  I have a special section set up where you can click on eight different world music instruments and hear them.  These instruments include didgeridoos, guitars, guiros, shekeres and pow-wow drums. You can also hear a song with each instrument and can color online or print-out coloring pages for each instrument that you find.  Check it out here at:

http://www.dariamusic.com/cajon.php

You can also get creative with 16 other musical instrument crafts such as Latin American maracas, Egyptian sistrums and a Chinese-style gong.  Feel free to explore and make them your own!

http://www.dariamusic.com/crafts.php

Be sure to check out the other amazing bloggers who are contributing to the Living Life Special Blog Carnival.
Living Life Special: Teaching Children CompassionAndie of Crayon Freckles recounts an encounter between her two children and a child with special needs.  Various activities are provided to help children develop compassion for others.
All Things Eyeron - Sylvia from Homeschooling Through Trials, Triumphs, and Tragedies shares a brief account of some experiences in the life of a younger sibling born into the family of a child with special needs.
From Boredom to Hyper-Focusing- Leann from Montessori Tidbits shares how special needs includes children who are gifted, as they have their own special set of needs that must be addressed on a daily basis.Beating the Loneliness of Special Needs - Kim from Tiaras & Bowties explores the loneliness that can accompany children, especially those with special needs as they journey into young adulthood.  Don’t miss these quick tips to help your child beat those feelings of exclusion and rejection while boosting self-esteem

Is There a Child with Special Needs in the Classroom? – Former teacher and insightful author, Susan Case offers guidance on how to prepare students for a child with special needs in the classroom.

One Thing You Should Know – Kim from The Little Stories writes about a mother of a child with autism shares the one that that all of us need to know – the one thing that will show her we understand her child is important and accepted.

I Call You - Sandy from We Can Do All Things, talks about how having a child with special needs pushes a parent into action.  They quickly become not just a parent, but a therapist, medical researcher, teacher, advocate, and expert in their child’s diagnosis.  They do things they never knew they could do, and be things they never knew they could do.

Fine Motor Leads to Fine Art – Debbie Clement is a children’s musician/song-writer, illustrator, author, and public speaker.  The also spent 10 years as a Resource teacher for young children with special needs.  Her article for the carnival examines Fine Motor Development and shares supportive observations for children with special needs on that
topic.

Make Your Own Musical Button Gloves!

This week we wanted to share a guest post and a wonderfully simple musical craft and activity from Cari at Time For Play – Button Gloves!

Hello Music Lovers.

I’m Cari from over at Time for Play. I have worked with young children for over 20 years and am now owner of my own Preschool.  Over on my blog, I share simple, cheap, and easy activities and experiences for young children.

I would like to share with you all how to make a very, simple instrument that you and your children can make.  They are Button Gloves.

I came up with them while working with 3 and 4 year olds who hadn’t quite mastered the snapping skill.  With these they can click, click, and click their way through song after song.

Here’s how we created them:

You need some gloves, buttons and a glue gun.

That’s all it takes.

Squeeze a drop of hot glue on each glove finger and press on a button.

You’re done!

Have the kids slip on their new button gloves and get to tapping.  We love to put them on and click them on the fridge, tile floor, wall, and some metal bowls and pans.

Exploring with these musical gloves provides a great experience in listening for differences in sounds and gets them using those little muscles in their hands that they will need for writing.  They learn coordination, cooperation, and social skills when they work with a partner to tap their gloves together too.

Musical button gloves can be a very simple musical instrument with an added bonus of helping  children develop and practice important skills. You can even make yourself some!  I did and enjoy them as much as the kids do!

 I would love for anyone to visit me at Time for Play . You can also find me on Facebook @Time for Play and Twitter @time_for_play.

Music in the Early (Learning) Years – Fun for Both Parents and Children!

Sometimes parents feel a bit intimidated about singing to their young child.  This wonderful post from music therapist, JoAnn Jordan emphasizes that you don’t have to “be perfect” but can focus on having fun with your child in simple ways that  encourage both creativity and learning!


Across the United States many communities will host special events April 22-28, 2012 as part of Week of the Young Child™. The National Association for the Education of Young Children has set this year’s theme as ”Early Years are Learning Years.” Parents and other adults in regular contact with a child are their first teachers. Through caring, supportive relationships with adults providing face-to-face interactions the basic skills for learning are developed.

A 1998 position paper by the International Reading Association and the National Association for the Education of Young Children indicates infants and toddler benefit from:

1.    Simple language paired with eye contact along with responses to a child’s vocalizations and physical responses.

2.    Frequent opportunities for play and song.

3.    Regular exposure to reading and books.

Music is one way you can support this development. Singing familiar songs easily supports simple language. Daria has a great collection of songs you can use. Once you have learned a song, sing without the recording. This allows you to change the speed (tempo), add opportunities for child to start a word or sound, and to change the lyrics.

Play can also be found in songs. Songs like “Ring Around the Rosie”,  “Pop Goes the Weasel” and “The Holey Pokey” are just a few examples of game songs.  For babies and toddlers there are games like peek-a-boo to which a song can be added. For example, the words to “Where is Thumbkin?” could easily be changed to:

Where is (insert child’s name)?

Where is (insert child’s name)?

There you are. There you are. (Remove the cover as you sing.)

I’m glad I found you. I’m glad I found you.

My dear child. My dear child.

There are many books based upon song lyrics such as “Itsy Bitsy Spider” and “Fiddle-I-Fee”. In addition, there are many books that can be sung. Lists of these books can be found on many sights including this post on Music Sparks.

Remember, perfection in singing is not required for your child to benefit for music. Rather, it is the face-to-face interaction that is key. Go ahead and add a little music to your speaking, playing and reading with your child. Music in these early learning years is fun.

_ _ _ _ _ _ _ _ _ _ _ _ _ _ _ _ _ _ _

JoAnn Jordan is a board certified music therapist with over 25 years of experience. She specializes in working with preschoolers and older adults. Her passion is bringing these two age groups together with music experiences. To learn more about music therapy and to see some of JoAnn’s resources visit her site www.music2spark.com .